Download LatencyMon — Real-Time Latency Checker
Measure kernel timer latencies, identify problematic drivers, and diagnose audio dropouts on your Windows PC with detailed DPC and ISR reports.
| Driver | DPC Count | Total Time |
|---|---|---|
| ndis.sys | 4,291 | 1.24 ms |
| dxgkrnl.sys | 2,108 | 0.45 ms |
| storport.sys | 1,556 | 0.29 ms |
| tcpip.sys | 987 | 0.15 ms |
What Is LatencyMon?
A deep look at the real-time latency monitoring tool built for audio professionals and system enthusiasts on Windows.
Real-Time Kernel Latency Analysis
LatencyMon is a free Windows utility developed by Resplendence Software that measures kernel timer latencies, Deferred Procedure Call (DPC) execution times, and Interrupt Service Routine (ISR) activity in real time. If you have ever dealt with audio glitches, crackling playback, or buffer underruns during recording sessions, this tool helps you pinpoint the exact driver or process responsible.
Unlike generic task managers, LatencyMon digs into the kernel level of your operating system. It reports which drivers consume the most DPC time and flags hard pagefaults that can stall real-time audio processing. The result is a clear picture of whether your machine can handle low-latency workloads without dropouts.
Who Benefits from LatencyMon?
Audio engineers, music producers, and podcasters rely on LatencyMon to verify that a system is ready for real-time recording before launching a DAW. Gamers use it to track down micro-stutters caused by misbehaving drivers. IT administrators run it during hardware qualification to confirm that a workstation meets real-time performance baselines. Even overclockers and enthusiasts find it useful for stress-testing driver stability after BIOS tweaks.
Platform and Version Details
LatencyMon runs on Windows XP SP3 through Windows 11, supporting both 32-bit and 64-bit editions. The current release, version 7.31, weighs roughly 3.3 MB and installs in seconds. The Home Edition is completely free for personal use, while a Professional Edition adds advanced logging and export features for corporate environments.
Resplendence Software, the Dutch company behind LatencyMon, also publishes other system inspection tools like WhySoSlow, so the codebase has years of real-world refinement. The application presents data through a tabbed interface with Stats, Processes, Drivers, and CPU views, making it straightforward to isolate the component causing latency spikes.
Ready to check your system? Download LatencyMon and start monitoring in under a minute.
System Requirements
LatencyMon runs on most Windows systems without heavy hardware demands. Check the specs below to confirm your PC is ready.
| Component | Minimum | Recommended |
|---|---|---|
|
Operating System
|
Windows XP SP3 (32-bit or 64-bit) | Windows 10 or Windows 11 (64-bit) |
|
Processor
|
1 GHz single-core CPU (x86 or x64) | 2 GHz multi-core CPU |
|
RAM
|
512 MB | 2 GB or more |
|
Disk Space
|
10 MB free space | 50 MB free space (for logs and reports) |
|
Display
|
1024 x 768 resolution | 1280 x 720 or higher |
|
Permissions
|
Administrator rights required | Administrator rights required |
|
Runtime
|
.NET Framework 2.0 or later | .NET Framework 4.5 or later |
LatencyMon needs administrator privileges to access kernel-level timing data. The software supports all Windows versions from XP SP3 through Windows 11, including both 32-bit and 64-bit editions.
Key Features
LatencyMon gives you a window into how your Windows kernel handles timing-critical tasks. Here is what it monitors and reports on.
Kernel Timer Latency Measurement
Tracks the actual time between when your system schedules a timer and when the kernel processes it. High values here often point to drivers or hardware that stall the scheduler.
DPC Execution Profiling
Measures Deferred Procedure Call times for each loaded driver. Long-running DPC routines are one of the most common causes of audio glitches, and LatencyMon pinpoints exactly which driver is responsible.
ISR Monitoring
Records Interrupt Service Routine execution counts and durations across every driver. When an ISR holds the CPU for too long, other interrupts get blocked, and LatencyMon shows you the data to prove it.
Hard Pagefault Detection
Counts hard pagefaults that force the system to read from disk mid-operation. Even a single hard pagefault during audio playback can cause a dropout if the disk is slow to respond.
Real-Time Suitability Verdict
Gives a color-coded verdict on whether your PC can handle real-time audio without dropouts. Green means you are good to go. Yellow or red means a driver or hardware component needs attention.
Live Latency Graphing
Plots interrupt-to-process latency over time in a scrolling graph. You can watch the latency curve while running your DAW or game to spot spikes the moment they happen.
Per-Driver Breakdown
Lists every loaded kernel driver sorted by its worst-case DPC or ISR execution time. This makes it straightforward to identify one misbehaving driver among the dozens loaded on a typical Windows install.
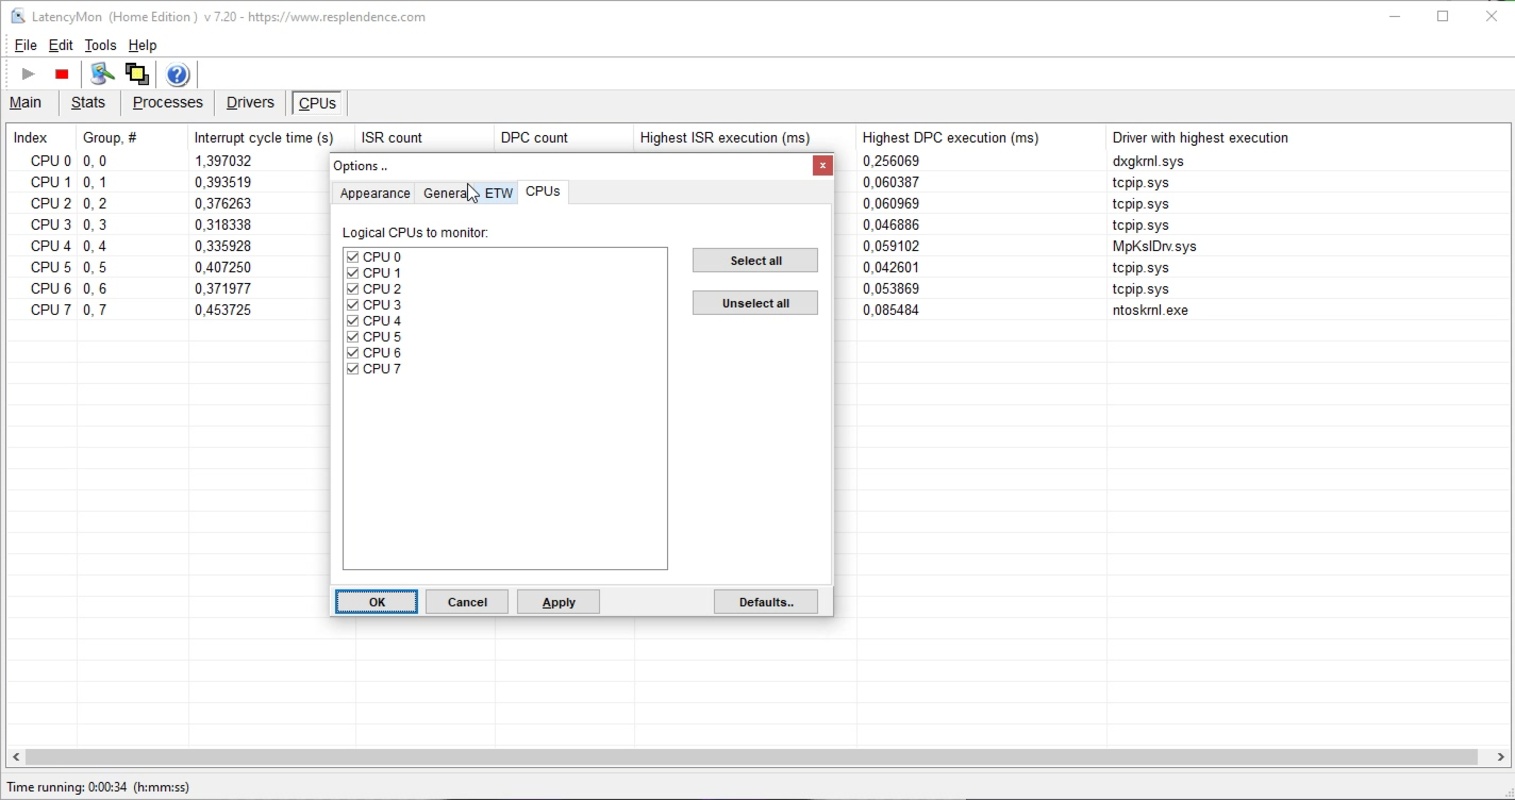
Multi-CPU Core Reporting
Reports latency stats per CPU core, so you can see if one core is consistently worse than others. Useful on systems where BIOS settings or driver affinity create uneven load distribution.
Continuous Background Monitoring
Runs in the background while you work, recording peak latency values over minutes or hours. Intermittent spikes that only show up under load are captured and reported when you check back.
Tabbed Analysis Interface
Organizes data into four tabs: Stats, Processes, Drivers, and CPUs. Each view focuses on a different angle of the latency problem, keeping the interface clean while the data stays deep.
All features are available in the free Home Edition. Download LatencyMon and start diagnosing latency in minutes.
Download LatencyMon
Get the latest version of LatencyMon and start measuring kernel timer latencies on your Windows PC in under a minute.
Free Home Edition — No registration required. Runs on Windows XP SP3 and later.
LatencyMon is freeware for personal use. The Home Edition includes full latency monitoring, DPC/ISR tracking, and driver analysis at no cost. A Professional Edition with additional reporting features is also available from Resplendence Software. Need help getting started? Check the getting started guide.
LatencyMon Screenshots
See the LatencyMon interface in action. Click any screenshot to view it full size.

Screenshots from LatencyMon v7.20 and v4.01 running on Windows 10/11
Getting Started with LatencyMon
From download to your first latency test in under five minutes. Follow these steps to set up LatencyMon and start diagnosing system performance on your Windows PC.
Head to our download section above to grab LatencyMon v7.31. The file weighs in at roughly 3.3 MB, so even on a slower connection you will have it within seconds. The download is a standard Windows EXE installer built with Inno Setup — there is no MSI variant or standalone portable ZIP available from Resplendence Software.
Which Build Should You Pick?
LatencyMon ships as a single installer that covers both 32-bit and 64-bit editions of Windows. During setup the installer detects your architecture automatically, so there is no need to choose between x86 and x64 yourself. The Home Edition is completely free for personal use. If you need advanced report export and extended driver analysis, Resplendence offers a paid Professional Edition, but the free build already provides everything you need for DPC and ISR latency testing.
Once the download finishes, you should see a file named something like LatencyMon-7.31.exe in your Downloads folder. Double-click it to launch the installer.
The LatencyMon installer is straightforward. Here is what to expect at each screen:
- License Agreement. The first window shows the Resplendence end-user license. Read through it, select I accept the agreement, and click Next.
- Destination Folder. The default path is
C:Program FilesLatencyMon(orProgram Files (x86)on older 32-bit systems). Leave this as-is unless you have a specific reason to change it. Click Next. - Start Menu Folder. The installer asks where to place the Start Menu shortcut. The default “Resplendence Software” group works fine. Click Next.
- Additional Tasks. You will see a checkbox for Create a desktop shortcut. Tick this if you want quick access from the desktop. There are no bundled toolbars, browser extensions, or adware checkboxes — the Resplendence installer is clean.
- Ready to Install. Review the summary and click Install. The progress bar fills in a few seconds thanks to the small 3.3 MB payload.
- Finish. Check or uncheck Launch LatencyMon depending on whether you want to open it immediately, then click Finish.
Silent Install for IT Admins
If you need to deploy LatencyMon across multiple workstations, the Inno Setup-based installer supports command-line switches. Run from an elevated Command Prompt:
The /SP- flag suppresses the initial prompt, /VERYSILENT hides the entire GUI, and /LOG writes a log file for auditing. Add /DIR="D:ToolsLatencyMon" if you need a custom install path.
LatencyMon is a Windows-only application. It does not run on macOS or Linux because it relies on the Windows NT kernel API for DPC and ISR measurement. If you are on another platform, look into tools like cyclictest on Linux or the built-in Instruments app on macOS for similar latency profiling.
LatencyMon does not have a first-run wizard. When you open it for the first time, the main window appears immediately with its tabbed interface. Before running your first test, take a minute to check a few settings.
Configuration Options
Open the menu bar and click Options. You will see these settings worth adjusting:
- Measurement interval — defaults to 1000 ms (1 second). For more granular data, drop this to 500 ms. Going below 500 ms adds overhead, so stick with 500–1000 ms for most cases.
- CPU selection — by default LatencyMon monitors all CPU cores. On multi-CPU or hyperthreaded systems, keep this set to All processors to catch spikes on any core.
- Report generation — under Options > Reporting, you can toggle automatic report saving. The Home Edition generates a basic text report; the Professional Edition supports HTML and detailed driver breakdowns.
There is no account registration, no license key entry for the free build, and no cloud sync. LatencyMon stores its settings locally in the Windows registry under HKEY_CURRENT_USERSoftwareResplendenceLatencyMon.
If you are migrating from an older version of LatencyMon, just install the new version over the existing one. Settings carry forward automatically and you do not need to uninstall first.
With LatencyMon open, here is how to run a latency test and interpret what you see.
Starting a Measurement
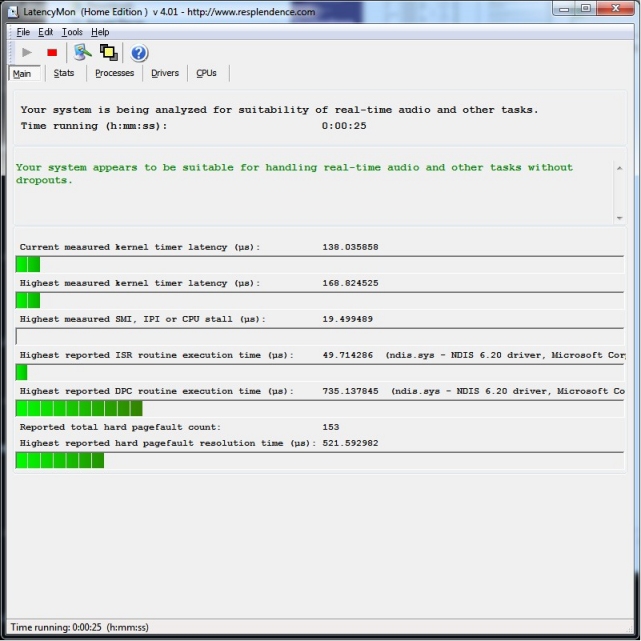
Click the green Start button in the toolbar (or press Ctrl+1). LatencyMon begins polling the kernel timer, recording DPC execution times, ISR counts, and hard page faults in real time. You will see the latency graph on the Stats tab start drawing immediately.
Let the test run for at least 3–5 minutes while you use your computer normally. Play audio, open a DAW project, or run the game that has been giving you stutter — LatencyMon needs to capture your typical workload to produce meaningful numbers.
Reading the Results
The Stats tab shows four key columns at a glance:
- Current Latency — the most recent interrupt-to-process latency sample in microseconds.
- Highest DPC — the worst-case Deferred Procedure Call execution time. If this number exceeds 2000 µs, your system may struggle with real-time audio at low buffer sizes.
- ISR Count — total Interrupt Service Routine invocations. A high count paired with long execution times points to a misbehaving driver.
- Pagefaults — hard page faults indicate data being pulled from disk into RAM, which stalls audio processing.
At the top of the Stats tab, a color-coded status bar summarizes the verdict. Green means your system handles real-time audio without dropouts. Orange indicates borderline performance. Red means DPC or ISR latency is too high for glitch-free playback.
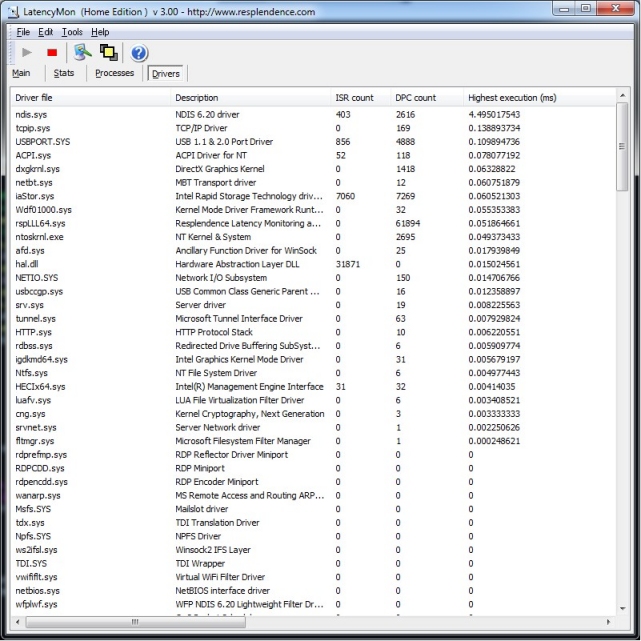
Drilling Into Drivers
Switch to the Drivers tab to see which kernel drivers are responsible for the longest DPCs. The table sorts by highest execution time. Common culprits include ndis.sys (network stack), dxgkrnl.sys (GPU), and storport.sys (storage controller). If a specific driver regularly exceeds 1000 µs, updating or disabling that device through Device Manager is your best first step.
The Processes tab lists user-mode processes sorted by hard page fault count, and the CPUs tab breaks down ISR and DPC load per core — helpful for spotting uneven interrupt distribution on multi-core chips.
Quick Reference
| Action | Toolbar | Shortcut |
|---|---|---|
| Start monitoring | Start | Ctrl+1 |
| Stop monitoring | Stop | Ctrl+2 |
| Reset counters | Reset | Ctrl+3 |
| Save report | File > Save Report | Ctrl+S |
| Copy stats to clipboard | Edit > Copy | Ctrl+C |
Reduce DPC Latency
High DPC latency is often caused by a single driver. Disable Wi-Fi and Bluetooth temporarily, then rerun the test. If the numbers drop significantly, update your wireless adapter drivers or switch to an Ethernet connection for recording sessions. On laptops, switching the power plan from Balanced to High Performance (or Ultimate Performance on Windows 10/11 Pro) prevents the CPU from throttling during measurements.
Common Beginner Mistakes
- Running the test for only a few seconds. Short tests miss intermittent spikes. Aim for 5–10 minutes under real workload conditions.
- Testing on an idle system. Latency problems appear under load. Play audio, stream video, or run your DAW while LatencyMon is active.
- Ignoring the Drivers tab. The Stats tab gives a summary, but the Drivers tab tells you exactly which kernel module is responsible.
Power-User Features
Save your report via File > Save Report and post it in audio production forums when asking for help — it gives other users the full picture instantly. The report includes OS build number, driver versions, and exact DPC/ISR timing data.
If you keep multiple driver configurations (for example, a studio setup versus a gaming setup), run LatencyMon after each change and compare saved reports side by side to verify improvements.
LatencyMon does not have a built-in auto-updater. Check back at our download section periodically for new releases from Resplendence Software.
Ready to test your system? Download LatencyMon and run your first latency check today.
Frequently Asked Questions
Answers to the most common questions about downloading, using, and troubleshooting LatencyMon on Windows.
Is LatencyMon safe to download and install?
Yes, LatencyMon is completely safe to download and install. The software is developed by Resplendence Software, a Netherlands-based company that has been building Windows system utilities since 2003. The official installer (version 7.31, approximately 3.3 MB) has been scanned clean by major antivirus engines including Windows Defender, Malwarebytes, and Norton.
LatencyMon does not modify your system files, change registry entries in harmful ways, or install background services. It operates strictly as a read-only monitoring tool that observes kernel timer latencies, DPC execution times, and ISR counts without altering system behavior. The installer contains no bundled adware, toolbars, or third-party offers. During installation, you will see a standard Windows UAC prompt because LatencyMon requires administrator privileges to access kernel-level performance data.
- Download only from the official Resplendence website or trusted sources like our download section
- Avoid third-party download sites like Softonic or CNET, which may bundle unwanted software
- If Windows SmartScreen flags the installer, click “More info” then “Run anyway” — this happens because the installer is not code-signed with an EV certificate
- The installation folder is typically
C:Program FilesResplendenceLatencyMonand contains only the application files
Pro tip: After installation, right-click LatencyMon and select “Run as administrator” to ensure accurate kernel-level readings. Without admin rights, some DPC and ISR measurements may be incomplete.
For step-by-step installation instructions, check our Getting Started guide.
Is LatencyMon free from malware and spyware?
Yes, LatencyMon is 100% free from malware, spyware, and any form of unwanted software. Resplendence Software has maintained a clean track record for over two decades of publishing Windows system utilities.
The LatencyMon installer weighs just 3.3 MB and installs only the files needed to run the application. It does not phone home, collect usage telemetry, or transmit any system data to remote servers. All latency measurements stay entirely on your local machine. The software has been reviewed and listed on trusted platforms including AlternativeTo, MajorGeeks, and Softpedia, all of which confirm it is adware-free and clean. Reddit communities like r/audioengineering and r/pcmasterrace regularly recommend LatencyMon as the go-to latency diagnostic tool, and no credible reports of malware have surfaced in its 20+ year history.
- No background processes running after you close the application
- No data collection or network communication during operation
- No bundled browser extensions, search engine redirects, or toolbar installations
- Clean uninstall through Windows Add/Remove Programs leaves no leftover files
Pro tip: If you downloaded LatencyMon from a third-party source and your antivirus flags it, delete that copy and grab the clean version from our download section instead. Third-party sites sometimes repackage installers with adware wrappers.
See the full list of LatencyMon features to understand exactly what the tool does on your system.
Where is the official safe download for LatencyMon?
The official download for LatencyMon is available from Resplendence Software at resplendence.com/downloads. You can also download it directly from our download section, which links to the verified official installer.
The current stable release is version 7.31, released in 2024, with a file size of approximately 3.3 MB. This version supports Windows XP SP3, Windows 7 SP1, Windows 8/8.1, Windows 10, and Windows 11 in both 32-bit and 64-bit editions. The installer file is named LatencyMon.exe and comes as a standard Windows executable. There is no separate MSI installer or portable ZIP archive offered by Resplendence for the free Home Edition.
- Our download page links directly to the official Resplendence installer
- Always verify the download file size is around 3.3 MB — significantly larger or smaller files indicate repackaged versions
- The installer should not ask you to install any browser extensions or third-party software
- LatencyMon is also listed on winget:
winget install Resplendence.LatencyMon
Pro tip: If you are on a managed corporate network and cannot install executables, ask your IT administrator to whitelist LatencyMon. The Professional Edition includes deployment options for enterprise environments.
Check our system requirements section to verify your PC meets the minimum specs before downloading.
Does LatencyMon work on Windows 11?
Yes, LatencyMon version 7.31 works on Windows 11 without any compatibility issues. The tool has been tested and confirmed working on Windows 11 versions 21H2 through 24H2, including both the Home and Pro editions.
LatencyMon runs natively on Windows 11 x64 and does not require compatibility mode or any special configuration. On Windows 11, it correctly identifies and monitors all modern kernel components including DirectX graphics kernel (dxgkrnl.sys), network stack drivers (ndis.sys, tcpip.sys), and storage drivers (storport.sys, stornvme.sys). Reddit users on r/pcmasterrace and r/techsupport regularly post LatencyMon results from Windows 11 systems for troubleshooting audio dropouts and gaming stutters. One common finding is that Windows 11’s newer audio subsystem and Intel Thread Director can affect DPC latency readings compared to Windows 10, though LatencyMon handles both correctly.
- Compatible with Windows 11 21H2, 22H2, 23H2, and 24H2
- Supports both x64 and ARM64 Windows 11 installations
- Works correctly with Intel 12th/13th/14th Gen hybrid architectures and AMD Ryzen processors
- No known conflicts with Windows 11 features like HAGS (Hardware Accelerated GPU Scheduling) or VBS (Virtualization Based Security)
Pro tip: On Windows 11 with Intel hybrid CPUs (P-cores and E-cores), run LatencyMon with all CPUs selected in Options to catch latency spikes that only occur on specific cores.
View the full system requirements for all supported Windows versions.
What are the minimum system requirements for LatencyMon?
LatencyMon has very low system requirements and runs on virtually any Windows PC made in the last 15 years. The minimum requirement is Windows XP Service Pack 3 with a Pentium-class processor and 512 MB of RAM.
The application itself consumes minimal resources during operation — typically under 20 MB of RAM and less than 1% CPU usage. This low overhead is by design, since a latency monitoring tool that consumed significant resources would skew its own measurements. The installer requires approximately 10 MB of free disk space. LatencyMon does not require a dedicated GPU, internet connection, or any specific hardware beyond a standard Windows-compatible processor. It works on desktops, laptops, tablets, and even virtual machines (though VM results may not reflect bare-metal performance).
- OS: Windows XP SP3, 7 SP1, 8/8.1, 10, or 11 (32-bit or 64-bit)
- CPU: Any x86 or x64 processor (including Intel Atom and AMD APUs)
- RAM: 512 MB minimum (the tool itself uses under 20 MB)
- Disk: 10 MB free space for installation
- Permissions: Administrator access required for kernel-level monitoring
Pro tip: If you are testing a system specifically for audio production, run LatencyMon while your DAW (Reaper, Cubase, Ableton) is loaded with a typical project. Idle system results do not reflect real-world performance under load.
For the full requirements table, see our System Requirements section.
Does LatencyMon work on macOS or Linux?
No, LatencyMon is a Windows-only application. It relies on Windows kernel APIs (specifically the Event Tracing for Windows framework and kernel performance counters) that do not exist on macOS or Linux. There are no macOS or Linux versions planned by Resplendence Software.
This limitation exists because LatencyMon measures Windows-specific kernel components: Deferred Procedure Calls (DPCs), Interrupt Service Routines (ISRs), and hard pagefaults within the Windows NT kernel. These concepts do not have direct equivalents in the macOS XNU kernel or the Linux kernel. On macOS, audio latency is managed through Core Audio, which handles buffer management differently. Linux audio professionals use JACK or PipeWire with kernel configurations (like RT-PREEMPT patches) that solve latency at the OS level rather than through monitoring tools.
- macOS alternative: Use the built-in Audio MIDI Setup utility or the
DTracecommand-line tool for kernel profiling - Linux alternative: Use
cyclictestfrom the rt-tests package to measure scheduling latency, orftracefor detailed kernel analysis - Cross-platform: If you need to test latency on multiple platforms, try network-focused tools like
mtroriperf3(though these measure network latency, not kernel latency)
Pro tip: If you dual-boot Windows and Linux for audio production, run LatencyMon on Windows to identify problematic drivers, then check whether those same hardware components have better Linux driver support.
Download LatencyMon for your Windows system from our download section.
Is LatencyMon completely free to download and use?
Yes, the LatencyMon Home Edition is completely free to download and use for personal, non-commercial purposes. There are no trial periods, feature limitations on core monitoring, or hidden costs.
The free Home Edition includes all the latency monitoring features most users need: real-time DPC and ISR measurement, driver-level analysis, process monitoring, hard pagefault tracking, and the system suitability verdict. You get the full Stats, Drivers, Processes, and CPUs tabs, plus the ability to generate text reports. The Home Edition has been free since LatencyMon first launched and Resplendence has never changed this policy. It is genuinely freeware for home users — not freemium, not ad-supported, and not time-limited.
- Free Home Edition covers all personal use scenarios: audio production troubleshooting, gaming performance analysis, general system diagnostics
- No account creation or email registration needed to download or use
- No ads, banners, or nag screens in the free version
- Free updates available through Help > Check for Updates
Pro tip: The free edition is more than sufficient for diagnosing audio dropouts and gaming stutters. The Professional Edition is only worth considering if you need commercial licensing or SMI (System Management Interrupt) measurement capabilities.
Grab the free Home Edition from our download section.
What is the difference between LatencyMon free and Professional edition?
The LatencyMon Professional Edition adds commercial licensing, SMI (System Management Interrupt) monitoring, and enterprise deployment features on top of everything in the free Home Edition.
For most home users, the free edition covers every diagnostic scenario: DPC latency measurement, ISR tracking, driver analysis, process-level monitoring, and the system suitability verdict. The Professional Edition adds several advanced capabilities that matter primarily to audio engineers, IT administrators, and system integrators. SMI monitoring is the biggest difference — System Management Interrupts are invisible to the standard Windows kernel and can cause latency spikes that even the free edition cannot detect. The Professional Edition also allows commercial use in business environments, recording studios, and broadcast facilities where the Home Edition license does not apply.
- Home (Free): DPC/ISR monitoring, driver analysis, pagefault tracking, report generation, personal use only
- Professional (Paid): Everything in Home plus SMI monitoring, commercial use license, priority support, and advanced export formats
- The Professional Edition is a one-time purchase from the Resplendence website — no subscription
- Both versions receive the same core updates (currently v7.31)
Pro tip: If LatencyMon free shows clean DPC/ISR numbers but you still hear audio glitches, an SMI could be the cause. In that scenario, the Professional Edition with SMI detection is worth the investment for professional audio work.
Review the full feature comparison to decide which edition fits your needs.
How do I download and install LatencyMon step by step?
Downloading and installing LatencyMon takes under two minutes. The installer is a standard Windows executable with no complex options or bundled software.
The current version (7.31) weighs approximately 3.3 MB, so the download finishes almost instantly on any broadband connection. The installation process uses a straightforward wizard with default settings that work well for nearly all users. No restart is required after installation, and you can begin monitoring latency immediately.
- Visit our download section and click the “Download LatencyMon” button to get the official installer
- Open the downloaded
LatencyMon.exefile. If Windows SmartScreen appears, click “More info” then “Run anyway” - Click “Next” through the setup wizard. The default install path (
C:Program FilesResplendenceLatencyMon) works for most systems - Accept the license agreement and click “Install.” The process finishes in a few seconds
- Launch LatencyMon from the Start Menu or desktop shortcut. Right-click and select “Run as administrator” for full kernel access
- Click the green “Start” button in the toolbar to begin monitoring. Let it run for at least 5-10 minutes under your typical workload
Pro tip: Pin LatencyMon to your taskbar if you troubleshoot latency regularly. You can also create a shortcut with admin privileges by right-clicking the shortcut, going to Properties > Advanced, and checking “Run as administrator.”
For a detailed walkthrough with configuration tips, read our Getting Started guide.
Does LatencyMon have a portable version I can run without installing?
No, Resplendence Software does not offer an official portable version of LatencyMon. The free Home Edition requires installation through the standard Windows installer.
The reason is technical: LatencyMon needs to install a kernel-mode driver to access low-level Windows performance counters for DPC, ISR, and pagefault monitoring. A portable application cannot load kernel drivers without installation, which is why the setup wizard is required. The installed footprint is very small — under 10 MB total — and the installer does not add background services, startup entries, or system tray icons. LatencyMon only runs when you explicitly launch it.
- Installation takes under 30 seconds and uses less than 10 MB of disk space
- The installed application does not auto-start with Windows or run in the background
- Clean uninstall through Control Panel > Programs and Features removes all files and registry entries
- If you need a portable latency check, the older DPC Latency Checker (by Thesycon) runs without installation, but it only measures DPC latency and may give inaccurate results on Windows 8 and newer
Pro tip: If you need to test latency on a machine where you cannot install software, try running xperf from the Windows Performance Toolkit (part of the Windows SDK) as a command-line alternative. It does not require installation if you copy the standalone binaries.
Download the standard installer from our download section.
How to fix LatencyMon showing high DPC latency?
High DPC latency in LatencyMon usually points to a specific driver hogging kernel time. The fix depends on which driver appears at the top of the Drivers tab sorted by “Highest DPC execution time.”
DPC values above 1000 microseconds are considered problematic for real-time audio, and anything above 2000 microseconds will likely cause audible dropouts. The most common offenders reported on Reddit and audio forums are network drivers (ndis.sys, tcpip.sys), GPU drivers (nvlddmkm.sys for NVIDIA, atikmdag.sys for AMD), and storage drivers (storport.sys). Each requires a different fix. Power management settings are another frequent cause — CPU throttling and C-state transitions can spike DPC latency during state changes.
- Identify the culprit: Open LatencyMon, click the Drivers tab, sort by “Highest execution” column, and note the top driver name
- Network drivers (ndis.sys): Disable Wi-Fi and test. If latency drops, update your wireless adapter driver or switch to Ethernet
- GPU drivers (nvlddmkm.sys): Use DDU (Display Driver Uninstaller) for a clean reinstall of the latest GPU driver. Disable HAGS in Windows Settings > Display > Graphics
- Power management: Switch to the “Ultimate Performance” power plan (
powercfg -duplicatescheme e9a42b02-d5df-448d-aa00-03f14749eb61). Disable C-states and SpeedStep/Cool’n’Quiet in BIOS - Audio drivers: If AudioDG.exe appears in the Processes tab, disable all audio enhancements in Sound Settings > Device Properties > Additional device properties > Enhancements
Pro tip: After making each change, reset LatencyMon (click the reset button) and run a fresh test for at least 10 minutes under load. Compare the “Highest DPC execution” values before and after to confirm the fix worked.
Check our Getting Started guide for detailed configuration steps.
Why does LatencyMon say my system is unsuitable for real-time audio?
LatencyMon marks a system as “unsuitable” when the highest measured interrupt-to-process latency exceeds approximately 2000 microseconds. This does not mean your PC is broken — it means specific drivers or settings are creating occasional latency spikes.
The suitability verdict on the Stats tab uses a color-coded system: green means suitable (under 1000 microseconds), yellow means borderline (1000-2000 microseconds), and red means unsuitable (over 2000 microseconds). Many perfectly functional PCs show a red verdict right after a fresh boot because background services and driver initialization create temporary spikes. Reddit users on r/buildapc and r/pcmasterrace frequently report that a “red” LatencyMon result does not always translate to actual audio problems. The verdict matters most for professional audio work with buffer sizes under 256 samples.
- Let LatencyMon run for at least 15 minutes after boot before trusting the verdict — initial spikes from Windows services are normal
- Test with your actual workload: open your DAW, load a project, or start a game while LatencyMon runs
- Check the Drivers tab to find which specific driver caused the highest spike
- A single spike above 2000 microseconds triggers the “unsuitable” verdict, even if 99.9% of readings are fine
- The verdict is conservative — systems marked “borderline” often perform well in practice at buffer sizes of 256 or higher
Pro tip: Use LatencyMon version 7.31 or newer. Older versions (before 7.0) sometimes gave misleading results, as multiple Reddit users have confirmed. Always check Help > Check for Updates to make sure you are running the latest build.
See our features section for details on how LatencyMon measures and reports latency data.
How to interpret LatencyMon results correctly?
LatencyMon results are spread across four tabs: Stats, Drivers, Processes, and CPUs. The Stats tab gives the overall verdict, while the Drivers tab reveals the actual culprits behind high latency.
On the Stats tab, focus on three key numbers: “Highest measured interrupt to process latency” (the worst-case delay your system experienced), “Highest DPC routine execution time” (the longest a single driver held the CPU), and “Hard pagefaults” (memory pages swapped from disk). For real-time audio at 44.1 kHz with a 128-sample buffer, your interrupt-to-process latency needs to stay below approximately 2900 microseconds. For gaming without stutters, values under 4000 microseconds are generally acceptable.
- Stats tab: Green bar = suitable (latency under 1000 µs), yellow = borderline (1000-2000 µs), red = unsuitable (over 2000 µs). The bar shows worst-case, not average
- Drivers tab: Sort by “Highest execution” to find the driver causing the biggest spikes. Common culprits: ndis.sys (network), nvlddmkm.sys (NVIDIA GPU), dxgkrnl.sys (DirectX graphics kernel)
- Processes tab: Shows which user-mode processes triggered hard pagefaults. High pagefaults from your DAW or game indicate insufficient RAM
- CPUs tab: On multi-core systems, check if latency spikes concentrate on specific cores. On Intel hybrid CPUs, E-cores may show higher latency than P-cores
Pro tip: Generate a text report via File > Save Log to share on forums when asking for help. The log includes all tabs in a format that experienced users can quickly diagnose.
For a detailed walkthrough of each tab, visit our Getting Started guide.
How do I update LatencyMon to the latest version?
To update LatencyMon, open the application and go to Help > Check for Updates. If a newer version is available, it will prompt you to download it. The current latest version is 7.31.
LatencyMon does not have an automatic background updater. You need to check manually or download the latest installer from the Resplendence website. Updating is important because older versions (particularly those before 7.0) can produce inaccurate results on modern Windows versions. A Reddit thread on r/GamingLaptops specifically warned that version 6.71 and earlier gave misleading “unsuitable” verdicts that led users on wild goose chases. Version 7.x introduced improved compatibility with Windows 10/11 and better handling of Intel hybrid architectures.
- Open LatencyMon and click Help > Check for Updates in the menu bar
- If an update is available, you will be directed to download the latest installer
- Close LatencyMon before running the new installer — it will upgrade the existing installation in place
- Alternatively, download the latest version directly from our download section and run the installer over your existing installation
Pro tip: Before updating, save your current LatencyMon report (File > Save Log) if you have test results you want to keep. The update process does not delete saved logs, but it resets the application state.
You can also install LatencyMon via Windows Package Manager: winget install Resplendence.LatencyMon. Winget handles updates automatically with winget upgrade.
Visit our download section to always get the newest release.
What is new in LatencyMon version 7.31?
LatencyMon 7.31 is the latest stable release (2024) and includes improved compatibility with Windows 11 24H2, better support for Intel 14th Gen and AMD Ryzen 7000/9000 series processors, and refined DPC/ISR measurement accuracy.
The 7.x series was a significant upgrade from the 6.x line. Key improvements across the 7.x releases include rewritten kernel monitoring that gives more accurate readings on Windows 10 and 11, better handling of modern multi-core CPUs with heterogeneous architectures (Intel P-cores and E-cores), and a refreshed user interface with clearer status indicators. The reporting engine was also improved to produce more actionable output, making it easier to identify which specific driver is causing latency spikes. Users upgrading from 6.x will notice substantially different (and more accurate) readings.
- Full Windows 11 24H2 compatibility with updated kernel hooks
- Improved accuracy for ISR/DPC measurements on Intel 12th-14th Gen hybrid CPUs
- Better identification of storage driver latency (NVMe/AHCI)
- Refined suitability verdict algorithm that reduces false “unsuitable” ratings
- Updated driver database for more accurate driver name resolution
Pro tip: If you were using a version older than 7.0 and got poor results, re-test with 7.31. The measurement improvements alone often change the verdict from “unsuitable” to “suitable” on the same hardware.
Download the latest version from our download section.
LatencyMon vs DPC Latency Checker — which is better?
LatencyMon is the better choice for most users. It provides far more detailed analysis than DPC Latency Checker, and unlike DPC Latency Checker, it gives accurate results on Windows 8 and newer.
DPC Latency Checker (originally by Thesycon, now also available from Wagnardsoft) only measures DPC latency and displays it as a simple bar graph. LatencyMon measures DPCs, ISRs, hard pagefaults, and interrupt-to-process latency, and it identifies the exact driver and process responsible for each spike. On AlternativeTo, LatencyMon is the top-rated alternative to DPC Latency Checker. A critical limitation is that DPC Latency Checker gives inaccurate readings on Windows 8, 10, and 11 due to changes in the Windows kernel timer resolution — this is confirmed by Dell engineering and widely reported on forums. LatencyMon uses newer Windows APIs (Event Tracing for Windows) that work correctly on all modern Windows versions.
- LatencyMon: DPC + ISR + pagefaults + driver identification + process monitoring + suitability verdict + report generation. Accurate on all Windows versions
- DPC Latency Checker: DPC only, simple bar graph, no driver identification, inaccurate on Windows 8+. Small and portable
- Reddit communities (r/edmproduction, r/audioengineering) strongly recommend LatencyMon over DPC Latency Checker for any modern Windows system
- If you see conflicting results between the two tools, trust LatencyMon — its measurement methodology is more comprehensive and accurate
Pro tip: DPC Latency Checker still has one advantage: it runs as a portable executable without installation. If you just need a quick, rough check on a machine where you cannot install software, it works for that narrow use case on Windows 7.
See our features section for a full breakdown of what LatencyMon monitors.
How long should I run LatencyMon for accurate results?
Run LatencyMon for a minimum of 15 minutes under your typical workload for meaningful results. For thorough testing, 30-60 minutes is recommended, especially if you are troubleshooting intermittent audio dropouts.
Short tests of 1-2 minutes often miss latency spikes caused by periodic system events like Windows Update checks, scheduled tasks, antivirus scans, or GPU driver power state transitions. Audio engineers on forums like Cakewalk and Reaper communities recommend running the test while your DAW is loaded with a typical project — idle system results can be misleading because they do not capture the actual workload your hardware needs to handle. The FlexRadio support team specifically advises running LatencyMon for at least 15 minutes while performing normal activities to get representative data.
- Quick check (5 minutes): Identifies major issues like a clearly broken driver. Good for a first pass
- Standard test (15-30 minutes): Catches most periodic latency spikes. Run with your DAW, browser, and typical apps open
- Thorough test (60+ minutes): Required for intermittent issues that occur only during specific events (Windows Update, scheduled scans, thermal throttling under sustained load)
- Always wait at least 5 minutes after boot before starting a test — Windows services and driver initialization cause temporary spikes
Pro tip: For audio production testing, load your largest project in your DAW, start playback, and let LatencyMon run for the entire session. The “Highest DPC execution time” value at the end tells you the absolute worst-case scenario your system experienced.
Learn the full testing workflow in our Getting Started guide.
Can LatencyMon help fix gaming stutters and frame drops?
Yes, LatencyMon can identify the kernel-level causes of gaming stutters that Task Manager and frame rate counters miss. If your game stutters despite normal CPU and GPU usage, a high DPC or ISR from a background driver is likely the cause.
Gaming stutters caused by kernel latency feel different from low FPS — the frame rate counter might show 120+ FPS while the game still hitches or micro-freezes every few seconds. This happens when a driver takes too long to process a deferred procedure call, briefly stalling the CPU and delaying frame delivery. Common culprits in gaming scenarios include NVIDIA’s nvlddmkm.sys (GPU driver), network drivers during online games, and USB controller drivers (especially on systems with many peripherals). Reddit users on r/pcmasterrace and r/techsupport regularly use LatencyMon to diagnose these exact issues.
- Close your game and launch LatencyMon as administrator
- Click Start, then launch your game and play for 15-20 minutes (intentionally triggering the stutter scenario if possible)
- Alt-Tab back to LatencyMon and check the Drivers tab, sorted by “Highest execution”
- If nvlddmkm.sys tops the list: clean install your GPU driver with DDU, disable HAGS in Settings > Display, and disable Game Mode
- If ndis.sys tops the list: your network adapter is the issue. Use Ethernet instead of Wi-Fi, or update the adapter driver
- If storport.sys or stornvme.sys tops the list: update your storage controller driver or check SSD firmware
Pro tip: Set your power plan to “Ultimate Performance” before gaming. CPU frequency scaling during games is a common source of micro-stutters that LatencyMon will catch as periodic DPC spikes from the CPU power management driver (intelppm.sys or amdppm.sys).
Check the features section for details on LatencyMon’s driver analysis capabilities.
How do I completely uninstall LatencyMon from my PC?
LatencyMon can be fully uninstalled through the standard Windows uninstaller. Open Settings > Apps > Installed apps (on Windows 11) or Control Panel > Programs and Features (on Windows 10 and earlier), find LatencyMon, and click Uninstall.
The uninstaller removes the application files from the installation directory (typically C:Program FilesResplendenceLatencyMon), the kernel-mode monitoring driver, Start Menu shortcuts, and desktop icons. LatencyMon does not leave behind background services, startup entries, or system tray components. The uninstall process takes a few seconds and does not require a system restart. No residual registry entries or hidden files remain after uninstallation.
- Close LatencyMon completely before uninstalling (check Task Manager to confirm no LatencyMon processes are running)
- On Windows 11: Settings > Apps > Installed apps > LatencyMon > Uninstall
- On Windows 10: Settings > Apps > Apps & features > LatencyMon > Uninstall
- On Windows 7/8: Control Panel > Programs and Features > LatencyMon > Uninstall
- Alternatively, run the uninstaller directly from the installation folder:
C:Program FilesResplendenceLatencyMonunins000.exe
Pro tip: If you plan to reinstall later, your LatencyMon settings are minimal (no complex configurations to lose). A fresh install behaves identically to a previous installation, so there is no need to back up preferences before uninstalling.
If you want to reinstall, grab the latest version from our download section.
Still have questions? Check our Getting Started guide for detailed walkthroughs, or visit the download section to get LatencyMon.